

How To Create Garden Sculptures
My garden is my paradise, so I love to add some sculpture to it. This project is a personal endeavour that has been brewing in my mind for a while. Contrary to what you make think, sculpting is not as difficult as you may think if you give yourself a chance. I'll provide you with a few key points to keep in mind and then you too can also add 'sculptor' to your resumé and make your own Concrete Face Garden Sculpture.

I fell in love with the huge faces by Igor Mitoraj! They are not complete, somewhat flat and can be placed just about anywhere. It's a great idea as it does not need to be so perfect or so complete.

Step #1: Make a plan
As I usually do, I make some sketches to keep track of those many visions in my mind's eye. This was not going to be a vessel or planter so it was really quite easy… Since it is a mask shape (halloween has many masks right now) you could possibly find one to make this project even simpler

Some memories of college crept back into my mind, drawing the planes of the face and basic proportions. You can always make an interpretation; be your own Picasso!
- Notice that the face is 5 'eyes' wide.
- the nose ends about 1/2 way from eyes to the chin.
- the lips are about 1/3 from nose to chin.
- Take note of side view as well for comparison of depth

Step #2; Create a Substructure
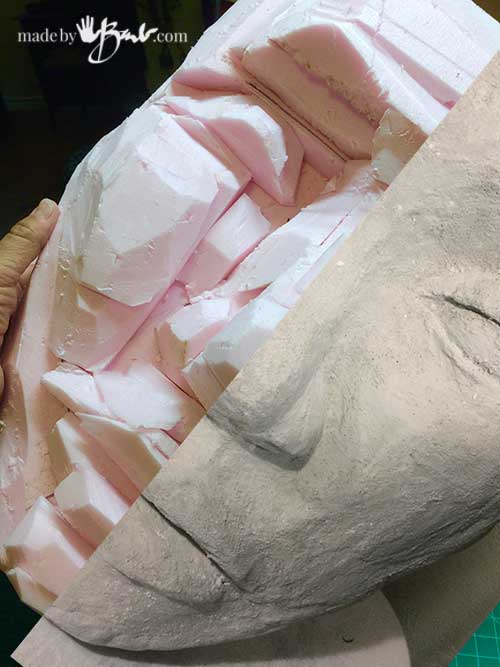
To give myself a starting structure that is light and sturdy, easy to manipulate (no heavy duty tools) I used styrofoam. I used that type meant for home insulation and comes in large sheets as I find it cuts cleaner than the white type used in packaging.

Plan the basic proportions on the styrofoam sheet. It cuts easily with a large exacto knife and glues quite well with a lower temperature glue gun. It was quite fun cutting and gluing, adding layers to also create the height of the facial features.
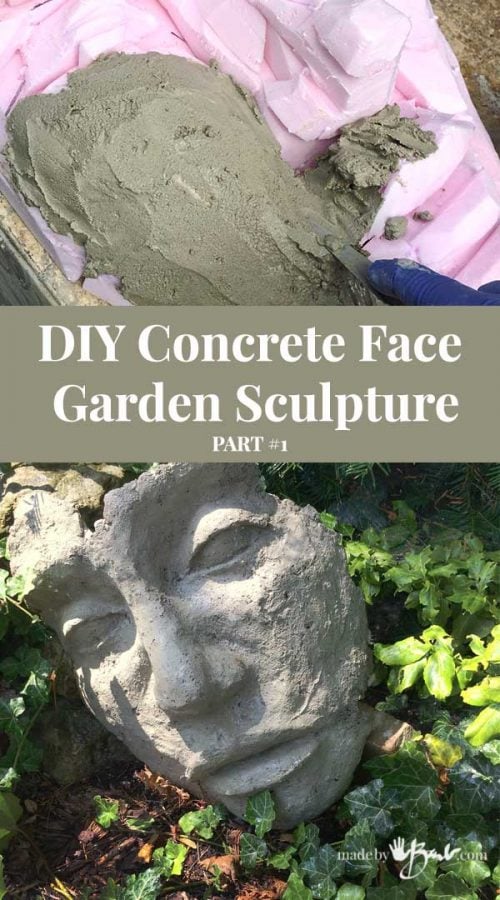
I wanted this DIY Concrete Face Garden Sculpture to be larger than life-size for maximum effect. Mine is about twice life-size; about 14″ wide by 18″ tall.

Cut and glue and cut and glue, slowly getting more details. The face is symmetrical, and can be broken into planes. Think of the flat planes first and then add the smaller details.

Check the depth of the nose and lips, use pictures as reference. Look in the mirror. It is quite an exploratory exercise.
Take a break and look at again with 'fresh' eyes to see what you may have not noticed before.
Step #3; Add the 'Skin'
Once I had the rough 'face', I needed to decide how this was going to go further… My plan was to be able to make a mold of the final sculpture, so I needed something that would harden without baking (styrofoam melts). Well, air dry clay recipes did not make me feel confident that they would be quite workable. So, I fell back to my usual, RapidSet concrete.
A true sculptor would argue with me, as it is a medium that does not allow subtractive work. But it sets quick, can be manipulated and is darn hard when done. So it was fine for me…
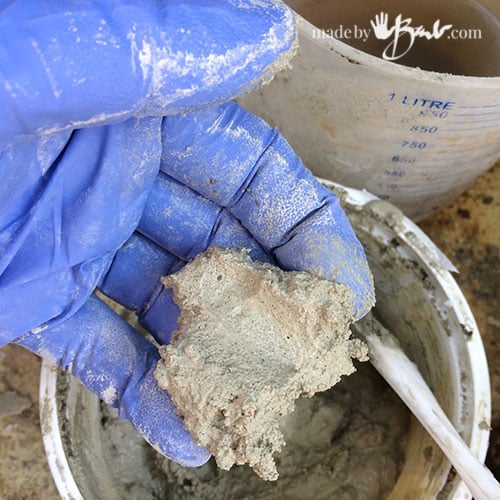
Mix up small amounts of the RapidSet Cementall (or similar quick setting cement) so that it does not set before you can use it up. It should be of a stiffer consistency that allows it to stay put. After about half a minute it will be a soft pliable 'icing-like' consistency.
If you need to continue and it has dried somewhat make sure to wet it (spray bottle works well) before adding wet concrete to it.

This was like putting the 'skin' on since the basics were already done. Smooth it on, use the gloved hands, trowel, palette knife, plastic utensils, popsicle sticks, whatever you can scrounge up.
It is just a matter of filling in the features. I was not that concerned that it was super smooth as I like the look of aged and pitted concrete as then it looks more like an ancient deteriorating sculpture of an old master artist… If you need some reference, grab a simple cheap Halloween mask to look at, all artists use reference materials.

Those are some big lips! It was also easier to sculpt since it was so large.

Eye lids, simple open eyes, remember eye balls are round…

There are so many different noses out there! Pointy, squared, up-turned… whatever you like.

Use an old brush to get rid of any crumbles or brush on a thin layer to even out roughness.

Whew, the face is sculpted! It will still be light and the concrete holds quite tight to the styrofoam. You could keep it like this, however I did not want the bulk of the back so I will take it to the next level.
This will become the 'master' for the mold! Stay tuned as it will be posted quite soon…

How To Create Garden Sculptures
Source: https://www.madebybarb.com/2017/09/19/diy-concrete-face-garden-sculpture/
Posted by: hortonsomint1948.blogspot.com
0 Response to "How To Create Garden Sculptures"
Post a Comment